(Trials of Fortitude reduced. They can be finished in a single run now.) |
m (typo) |
||
| Line 22: | Line 22: | ||
It doesn't take long to reach the first trial there: Trial by Combat. Tidus is anxious to get moving, so he offers a competition: which of the two can bag monsters the fastest? Wol is obviously the better of the two, but it gets worrying when they find Tidus' [[Brotherhood]] sword cast aside. Wol does a bit of searching and finds Tidus is okay. He had to run from a stronger monster, and lost his sword in the process. Luckily, he found a [[Survival Knife]] to tide him over. Wol scolds him, which makes Tidus smile: the veteran is gruff, but underneath it he really cares... much like [[Legendary Guardian|someone else Tidus knew]]. |
It doesn't take long to reach the first trial there: Trial by Combat. Tidus is anxious to get moving, so he offers a competition: which of the two can bag monsters the fastest? Wol is obviously the better of the two, but it gets worrying when they find Tidus' [[Brotherhood]] sword cast aside. Wol does a bit of searching and finds Tidus is okay. He had to run from a stronger monster, and lost his sword in the process. Luckily, he found a [[Survival Knife]] to tide him over. Wol scolds him, which makes Tidus smile: the veteran is gruff, but underneath it he really cares... much like [[Legendary Guardian|someone else Tidus knew]]. |
||
| − | The second trial comes as tests of skill... or endurance, if skill isn't enough. Tidus still shows the same eagerness, talking about how a battle is much like a Blitzball match. Watch your own team, watch the opposite team, hang back if it's too much, and strike when your advantage is best. Wol respects that, but he'll stick to his own methods. He lets Tidus |
+ | The second trial comes as tests of skill... or endurance, if skill isn't enough. Tidus still shows the same eagerness, talking about how a battle is much like a Blitzball match. Watch your own team, watch the opposite team, hang back if it's too much, and strike when your advantage is best. Wol respects that, but he'll stick to his own methods. He lets Tidus lead the way. It's a close contest, but Tidus emerges on the other end first. |
[[File: Keep the Goal in Mind.jpg|right|250px]] |
[[File: Keep the Goal in Mind.jpg|right|250px]] |
||
Revision as of 02:58, 10 January 2020

| “ | Final Fantasy X & Mobius FF
Bolstered by a new purpose, Tidus returns to Cornelia to begin his quest to become the Warrior of Light. |
„ |
| ~ In-game description |
Dream Within a Dream, Part 2 or Episode 2, is the second main story chapter for the Final Fantasy X Collaboration Event. It features Tidus from Final Fantasy X returning to the Plains of Cornelia to follow the initial steps to be the Warrior of Light, while Wol keeps a watchful eye on him.
Event Details
- Event duration: September 1 - November 30, 2018
- Event type: Collaboration story region.
How to Participate
- Select "FFX Episode 2: To Cornelia" from the world map -- branched off of the Chapter 1: Blank Slate node.
- You must complete Dream Within a Dream, Part 1 before this region becomes available.
Story
Continued from Dream Within a Dream, Part 1 and FFX Blitzball
Tidus reflects on his sudden appearance in the world of Palamecia, similar to his sudden appearance in Spira. It's a tough road, but it seem to be the obvious choice, if not the only choice: Do as Palamecians would do... and that means to become the Warrior of Light! Tidus' eagerness amuses Wol and thrills Echo. This kid could become Vox's favorite! Except he hasn't heard a peep from Vox. How very strange.
First need is strength training, so back to the Plains of Cornelia we go!
It doesn't take long to reach the first trial there: Trial by Combat. Tidus is anxious to get moving, so he offers a competition: which of the two can bag monsters the fastest? Wol is obviously the better of the two, but it gets worrying when they find Tidus' Brotherhood sword cast aside. Wol does a bit of searching and finds Tidus is okay. He had to run from a stronger monster, and lost his sword in the process. Luckily, he found a Survival Knife to tide him over. Wol scolds him, which makes Tidus smile: the veteran is gruff, but underneath it he really cares... much like someone else Tidus knew.
The second trial comes as tests of skill... or endurance, if skill isn't enough. Tidus still shows the same eagerness, talking about how a battle is much like a Blitzball match. Watch your own team, watch the opposite team, hang back if it's too much, and strike when your advantage is best. Wol respects that, but he'll stick to his own methods. He lets Tidus lead the way. It's a close contest, but Tidus emerges on the other end first.
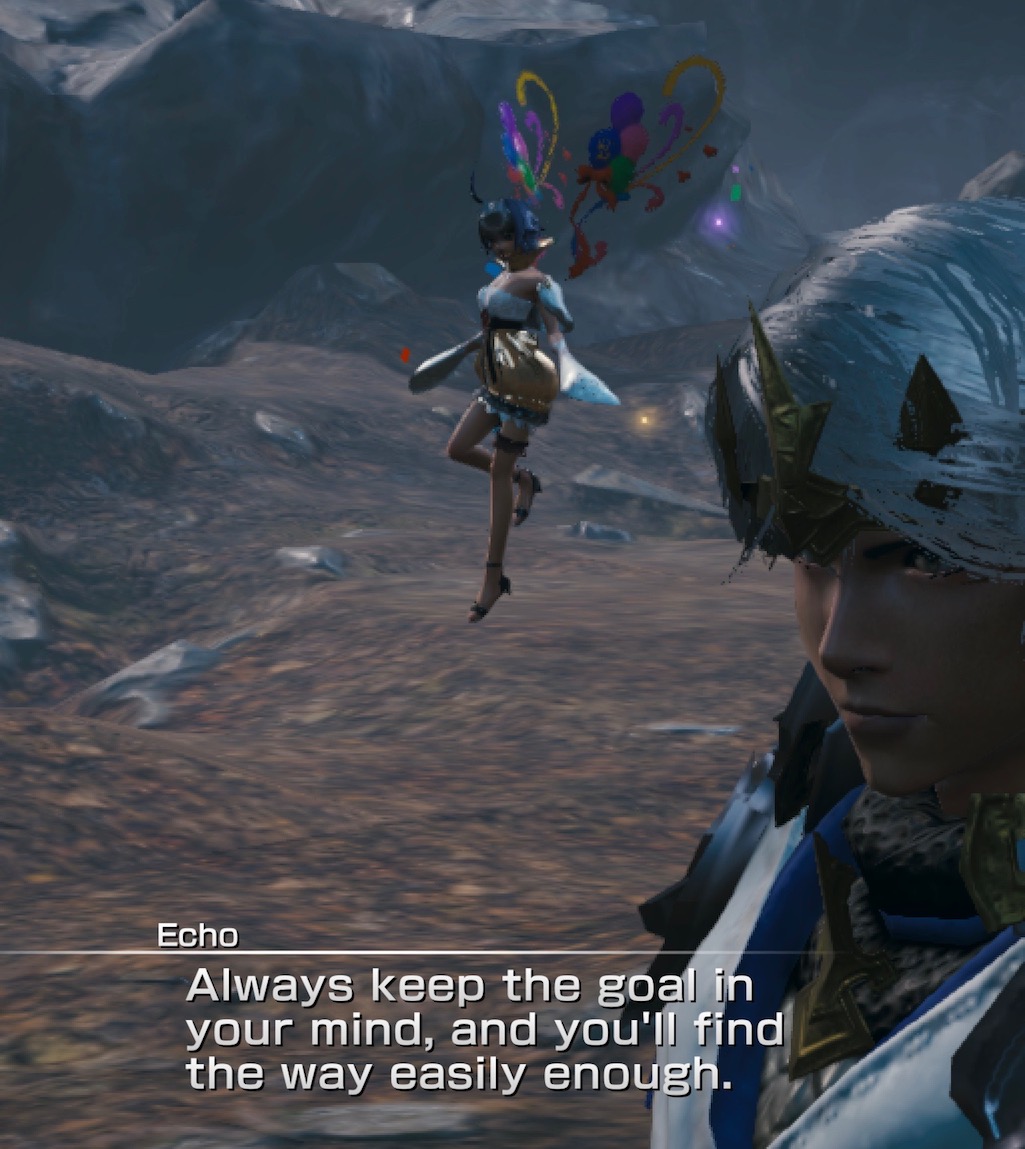
Wol reminds Tidus that if being the Warrior of Light is his intent, then a competition like this is just a distraction. What should he be aiming for, then? Echo says that he has to decide his own goal. Its gives Tidus something to think about: what does he really want? It doesn't take him long to reach the simple answer: to become the Warrior of Light and save Palamecia! (sigh.) In his enthusiasm, Tidus suggests to Wol that if they get separated, he can just whistle... which trips a memory of saying that same thing to Yuna in Spira. He's left somber by the memory, and he won't talk about it.
Just as well, because another trial appears: the plains are on fire! It's pretty clear that Palamecia is doing it again, forcing our heroes to overcome more obstacles. It's confusing and taxing, but the two get the job done, and put the fire out.
Throughout it all, Tidus just keeps on fighting, long after showing signs of fatigue. Echo and Wol both recommend that Tidus get some rest, or he'll burn himself out. It's dismaying, until Wol realizes that's the point: Tidus wants to burn himself out. He's not trying to get stronger or move forward in being the Warrior of Light, he wants to lose himself in battle. He wants to use battle to help him forget about Spira. Confronted with this, Tidus admits it's true.
Tidus is still unwilling to explain, but the conversation is cut short by the arrival of a trusted friend... from Spira! Not so friendly, though, as it attacks them. Wol leaps forward and defends against the creature, knocking it down, and in doing so seems to break it out of its aggression. It calls to Tidus, and when he meets the creature it explodes into a swarm of pyreflies... then the two of them vanish entirely.
In the void between the worlds, Tidus awakens, on the way to... somewhere else? There are pyreflies here, too, and they coalesce into the visage of Yuna, his partner from Spira. He reaches for her, but she doesn't respond. He whistles for her, like the two of them had agreed in a previous life, and the pyreflies separate again.
Tidus whites out, and awakes... floating in the sea, just off an island. He looks around, stunned. It looks like Spira. A blitzball hits him in the head, and he turns around to find Yuna standing at the shore.
Continued in Dream Within a Dream, Part 3.
Event Map

| “ | FFX: Dream Within a Dream Episode 2: To Cornelia From the sleepless Zanarkand to Spira, then to the land of hope unbound, Tidus searches for meaning in being shunted from world to world... and finds it in aiming to become the Warrior of Light. |
„ |
| ~ World Map description |
The region offers up a new extension: the Sphere Grid. As you traverse the region, you'll recieve Spheres as a reward, which you can use to enhance your stats and add extra Auto-Abilities. The fiends will get stronger to compensate for that, so be prepared for some heavy fighting! At the top of the region map is the button to go over to the Sphere Grid. Just under that is a gold button that brings up the current list of the sphere's you've collected, minus ones you've already activated on the Grid.
The region has three more trials to complete:
- First, the Trial of Combat. Straightforward fights against strong enemies.
- The Second offers a choice. There is the Trial of Skill, where you need to perform a few different exercises in controlled application of the elements:
- Kill the listed number of fiends in one shot. Obviously you'll need a very good Area Effect ability, an Ultimate, or a Supreme Card. Set up the fiends so that it only takes one hit each to break them, so you can switch down the line, one after the other, leaving up to 7 broken before the first one recovers (or use an ability with Cleaving Attack to break them all at once), then wipe them all out at once.
- Finish the area within a maximum of the listed number of attacks from the fiends. Crowd control is important here. You'll need to break all of them en masse, using something with Cleaving Attack again. Breaking one by one will NOT get you there.
- Defeat the listed number of foes with the listed element. Each skirmish will have a swarm of foes that absorb that particular element, plus 1-3 others of some other element. You'll need to pick off the desired ones first (or last!) while being very careful to use specific elements on specific fiends. Area spells are NOT your friend here.
- Alternatively, you can try the Trial of Fortitude. These are more straightforward fights, but it will take 3-4 runs on the area to clear the lock. These areas do have nice treasure chests, so they are worth clearing at least once to get the treasures.
- Kill 100 fiends to advance. Any element, any way.
- Break 100 fiends before killing them.
- Kill 40 fiends with their elemental weakness. This includes elemental abilities and elemental-imbued normal attacks. Break state does not matter.
- The event's return in 2020 reduced the number on these to a small fraction, so the Fortitude areas can now be finished in a single attempt.
- The Third trial is a maze. The Trial of Flame is 2x2 grid, while the Trial of Perfervidity is a 3x3 grid. Each individual area is a simple, one-skirmish fight, but you must negotiate the areas in a specific path. Hit the right path, and you continue, or you finish the maze. Select the wrong path, and you must start that section over again. There's no indicator for the path, so you'll have to learn it hit-or-miss. Expect 2-5 attempts, unless you're very good at guessing.
There are 58 areas in total, with 22 treasure chests.
Areas
| Area | Stamina | Battles | Lock requirements | Description | Reward |
|---|---|---|---|---|---|
| Castle Cornelia | 2 | 1 | (starting point) | - | |
| Rear Gate | 3 | 2 | - | ||
| Road to Proving Grounds | 4 | 3 | |||
| Moss-covered Ramparts | 4 | 3 | (set an Attribute Sphere into your Sphere Grid) | - | |
| Hidden Bog | 4 | 3 | Lv.1 | ||
| Trial of Combat: Entrance | 3 | 2 | (set a Key Sphere into your Sphere Grid) | ||
| Trial of Combat 1 | 4 | 3 (2) | - | ||
| Trial of Combat 2 | 4 | 3 (2) | - | ||
| Trial of Combat 3 | 5 | 4 (3) | |||
| Trial of Combat 4 | 5 | 4 (3) | - | ||
| Trial of Combat 5 | 6 | 5 (4) | |||
| Trial of Combat 6 | 6 | 5 (4) | - | ||
| Runic Temple | 7 | 6 (5) | Lv.2 | ||
| To Proving Grounds | 4 | 3 | (set an Auto-Ability Sphere into your Sphere Grid) | - | |
| Warhaven | 4 | 3 | - | ||
| Trial of Skill: Entrance | 3 | 2 | - | ||
| Fork in the Road (1) | 3 | 2 | Lv.3 | ||
| Trial of Fortitude 1 | 6 | 5 | Break through their blockade to proceed! |
||
| Trial of Skill 1 | 4 | 3 | A gauntlet of powerful foes block the way! Defeat them to proceed! |
- | |
| Trial of Skill 2 | 5 | 4 | Trial of Skill 1 Defeat w/ one ability: 4 |
A gauntlet of powerful foes block the way! Defeat them to proceed! |
- |
| Trial of Skill 3 | 6 | 5 | Trial of Skill 2 Defeat w/ one ability: 6 |
Defeat them to proceed! |
|
| Fork in the Road (2) | 3 | 2 | Trial of Fortitude 1 Enemies Defeated: Trial of Skill 3 |
Lv.4 | |
| Trial of Fortitude 2 | 6 | 5 | Break through their blockade to proceed! |
||
| Trial of Skill 4 | 4 | 3 | A gauntlet of powerful foes block the way! Fell them rapidly and Break them strategically to clear the path! |
- | |
| Trial of Skill 5 | 5 | 4 | Trial of Skill 4 Enemy attacks received: 3 |
- | |
| Trial of Skill 6 | 6 | 5 | Trial of Skill 5 Enemy attacks received: 2 |
||
| Fork in the Road (3) | 3 | 2 | Trial of Skill 6 Enemy attacks received: 0 Trial of Fortitude 2 |
Lv.5 | |
| Trial of Fortitude 3 | 6 | 5 | Break through their blockade to proceed! |
||
| Trial of Skill 7 | 4 | 3 | Use Beware the Flans' absorption ability! |
||
| Trial of Skill 8 | 5 | 4 | Trial of Skill 7 Defeated with fire: 3 |
Use Beware the Flans' absorption ability! |
|
| Trial of Skill 9 | 6 | 5 | Trial of Skill 8 Defeated with water: 5 |
Use Beware the Flans' absorption ability! |
|
| Threshold of Glory | 6 | 5 (4) | Trial of Skill 9 Defeated with wind: 8 Trial of Fortitude 3 |
Lv.6 | |
| The First Valley | 4 | 3 | - | ||
| Trial of Flame | 4 | 3 | |||
| Citadel of Flame (1) | 3 | 1 | The fire blazes! Proceed along the correct route to extinguish the flames, but fail and you'll have to try again! |
- | |
| Citadel of Flame (2) | 3 | 1 | - | ||
| Citadel of Flame (3) | 3 | 1 | - | ||
| Citadel of Flame (4) | 3 | 1 | - | ||
| Trial of Perfervidity | 4 | 3 | |||
| Citadel of Perfervidity (1) | 3 | 1 | The fire blazes! Proceed along the correct route to extinguish the flames, but fail and you'll have to try again! |
- | |
| Citadel of Perfervidity (2) | 3 | 1 | - | ||
| Citadel of Perfervidity (3) | 3 | 1 | - | ||
| Citadel of Perfervidity (4) | 3 | 1 | - | ||
| Citadel of Perfervidity (5) | 3 | 1 | - | ||
| Citadel of Perfervidity (6) | 3 | 1 | - | ||
| Citadel of Perfervidity (7) | 3 | 1 | - | ||
| Citadel of Perfervidity (8) | 3 | 1 | - | ||
| Citadel of Perfervidity (9) | 3 | 1 | - | ||
| Base of the Inferno | 7 | 6 | |||
| Echoes of the Farplane | 4 | 3 | - | ||
| Memories Unspoken | 4 | 3 | Beware |
||
| Den of Pyreflies | 6 | 5 | In the place where the Farplane meets Palamecia, pyreflies fill the air. You sense a |
||
| Temple: Lower Level | 6 | 5 | A powerful enemy stands in your way! Overcome the trial to receive your just rewards! |
- | |
| Temple: Lower Level 2 | 7 | 6 | - | ||
| Temple: Lowest Level | 8 | 7 | Beware |
- | |
| Treasury 1 | 4 | 3 | Runic Temple: Lower Level Battle Score: 300,000,000 |
Overcome the trial to receive your just rewards! | |
| Treasury 2 | 4 | 3 | Runic Temple: Lower Level 2 Job & Member changes: 1 |
||
| Treasury 3 | 4 | 3 | Runic Temple: Lowest Level Complete Without Continues: 1 |
Post-completion
Once the region has been cleared at the end of the Den of Pyreflies area, two bonus options open:
- An extra area branch opens from the Runic Temple. Three levels have very specific high-end requirements, which open access to three "treasure" levels.
- The boss levels gain new drops: Scroll cards for the Late August ability card batch:
| Area | Stamina | Battles | Scroll Card |
|---|---|---|---|
| Trial of Combat: Entrance | 6 | 5 | Varuna: FFX (scroll) x5 |
| Trial of Skill: Entrance | 6 | 5 | Oblitzerator: FFX (scroll) x5 |
| Trial of Flame | 6 | 5 | Biran & Yenke: FFX (scroll) x5 |
| Den of Pyreflies | 6 | 5 | YAT-99: FFX (scroll) x5 |
Key Items
These items are gathered to unlock spaces on the Sphere Grid.
 Attribute Sphere
- Auto-Ability Sphere (green)
- Auto-Ability Sphere (blue)
- Key Sphere
Special Fiends
Reference
Trivia
- Music is from Final Fantasy X Remaster soundtrack:
| Area | FFX track name |
|---|---|
| Opening movie, ending areas | Tidus' Theme |
| First areas | The Blitzers |
| Sphere Grid | The Splendid Performance |
| Battles, Trial of Skill | Battle Theme |
| Trial of Combat | Blitz Off! |
| Trial of Skill | Run!! |
| Trial of Fire | The Trials |
| The ending battle | The Truth Revealed |
| Ending movie | Yuna's Theme Zanarkand |