BryghtShadow (talk | contribs) No edit summary |
m (→Areas) |
||
| (3 intermediate revisions by one other user not shown) | |||
| Line 1: | Line 1: | ||
| − | {{stub|Missing Dec 2018 changes.}} |
||
[[File: Last Calling banner.jpg|right|400px]] |
[[File: Last Calling banner.jpg|right|400px]] |
||
{{Quote|'''FINAL FANTASY VII meets MOBIUS FF''' |
{{Quote|'''FINAL FANTASY VII meets MOBIUS FF''' |
||
Despair echoes from the planetary depths. Wield the power of materia and challenge the hero from the skies.|In-game description}} |
Despair echoes from the planetary depths. Wield the power of materia and challenge the hero from the skies.|In-game description}} |
||
| − | '''Last Calling''' is a Ranked "battle tower" event |
+ | '''Last Calling''' is a Ranked "battle tower" event offered as part of the [[Final Fantasy VII Collaboration Event]]s. It features solo battles against [[Sephiroth (Sicarius)|Sephiroth]]. |
== Event Details == |
== Event Details == |
||
| − | * |
+ | * ''First instance:'' February 22 – March 1, 2018 |
| + | * ''Second instance:'' December 17 – 31, 2018 |
||
| − | * Event type: progressive Tower Battle |
+ | * ''Event type:'' progressive Tower Battle |
=== How to Participate === |
=== How to Participate === |
||
[[File: Last Calling world map.jpg|right|250px]] |
[[File: Last Calling world map.jpg|right|250px]] |
||
| − | * Select "FFVII: Last Calling" from the world map |
+ | * Select "FFVII: Last Calling" from the Act 1 world map -- off of the red "Specials" hub. |
* This event is only accessible after a player clears the Runic Temple in Chapter 1 |
* This event is only accessible after a player clears the Runic Temple in Chapter 1 |
||
| Line 32: | Line 32: | ||
{{Quote|Despair echoes from the planetary depths. Wield the power of materia and challenge the hero from the skies.|World Map description}} |
{{Quote|Despair echoes from the planetary depths. Wield the power of materia and challenge the hero from the skies.|World Map description}} |
||
| − | + | The original Feb 2018 event allowed use of [[Fatal Calling#Materia|Materia]] commands, giving an extra set of up to 6 actions that could be used in this conflict. Depending on how much materia the player has gathered in [[Fatal Calling]], these can be major spells.... and these were essential for victory once the player reached the final areas of the map. Subsequent appearances dropped the Materia use (and re-balanced difficulties), allowing anyone to participate. |
|
The progression is a linear one on this event, going from the outer surface down and in to the central space amongst the Planet Depths. Along the way, the player will change maps twice, but the progression maintains a single path. Enemies along the way comprise a comprehensive medley of the enemies from [[Fatal Calling]], as well as both the current and original enemies from [[Eclipse Contact]]. '''Each area finishes with a solo fight against {{boss|none}} [[Sephiroth Copy]].''' As in other ranked events, Sephiroth starts out very easy to beat, but gets progressively harder with each victory. |
The progression is a linear one on this event, going from the outer surface down and in to the central space amongst the Planet Depths. Along the way, the player will change maps twice, but the progression maintains a single path. Enemies along the way comprise a comprehensive medley of the enemies from [[Fatal Calling]], as well as both the current and original enemies from [[Eclipse Contact]]. '''Each area finishes with a solo fight against {{boss|none}} [[Sephiroth Copy]].''' As in other ranked events, Sephiroth starts out very easy to beat, but gets progressively harder with each victory. |
||
| ⚫ | Clearing an area also drops a [[Sephiroth Copy (Card)]], useful to upgrade the [[Sephiroth: DISSIDIA FF (Card)]] handed over as a gift at the beginning of the FFVII Campaign. The player can teleport back to previously completed areas at any time. Since only the areas on the current map are visible, the player must again defeat the transitional areas to switch to the previous maps. Repeating previously cleared areas will earn more cards, but does not increase the player's kill count or ranking. |
||
| ⚫ | After completing ''The Last Battle'' , the player enters the ''Phantasmic Coil'' areas. This is a set of |
||
| + | |||
| ⚫ | After completing ''The Last Battle'' , the player enters the ''Phantasmic Coil'' areas. This is a set of 4 areas that repeat in an infinite loop, also with an increasing difficulty with each area finished. Players here do not get a fifth "rental" card, and cannot use {{link|Phoenix Down}} to revive if defeated. Each cycle through the 4 Phantasmic Coil areas will get a reward of {{link|Ability Ticket}} x7. |
||
| ⚫ | |||
There are 17 total areas and 13 treasure chests. Since the last treasure chest (in the Phantasmic Coil) automatically regenerates, the last chest can technically never be completed. |
There are 17 total areas and 13 treasure chests. Since the last treasure chest (in the Phantasmic Coil) automatically regenerates, the last chest can technically never be completed. |
||
| Line 47: | Line 48: | ||
! Stamina |
! Stamina |
||
! Battles |
! Battles |
||
| − | ! Enemies (except |
+ | ! Enemies (except [[Sephiroth (Sicarius)|Sephiroth]]) |
| − | ! Treasure |
+ | ! Treasure 1 |
| + | ! Treasure 2 |
||
|- |
|- |
||
| Northern Cavern - Caldera |
| Northern Cavern - Caldera |
||
| Line 55: | Line 57: | ||
| - |
| - |
||
| (starting point) |
| (starting point) |
||
| + | | |
||
|- |
|- |
||
| Northern Cavern - Outer Ring 1 |
| Northern Cavern - Outer Ring 1 |
||
| Line 61: | Line 64: | ||
| [[Security: Medical Team]] Fire x2 |
| [[Security: Medical Team]] Fire x2 |
||
| {{link|Phoenix Down}} x3 |
| {{link|Phoenix Down}} x3 |
||
| + | | {{link|Summon Ticket}} x1 |
||
|- |
|- |
||
| Northern Cavern - Outer Ring 2 |
| Northern Cavern - Outer Ring 2 |
||
| Line 67: | Line 71: | ||
| [[Guard Hound]] Wind, Earth, Light <br> [[Security: Nekomata Squad]] Water x2 |
| [[Guard Hound]] Wind, Earth, Light <br> [[Security: Nekomata Squad]] Water x2 |
||
| {{link|Elixir}} x3 |
| {{link|Elixir}} x3 |
||
| + | | {{link|Phoenix Down}} x3 <br> {{link|Elixir}} x3 |
||
|- |
|- |
||
| Northern Cavern - Inner Entrance |
| Northern Cavern - Inner Entrance |
||
| Line 73: | Line 78: | ||
| {{orb|fire}} [[Hedgehog Pie]] x2 <br> [[Security: Titan Squad]] Fire, Wind, Earth |
| {{orb|fire}} [[Hedgehog Pie]] x2 <br> [[Security: Titan Squad]] Fire, Wind, Earth |
||
| {{link|Ether}} x3 |
| {{link|Ether}} x3 |
||
| + | | {{link|Magicite}} x500 <br> {{link|Ether}} x3 |
||
|- |
|- |
||
| Northern Cavern - Interior 1 |
| Northern Cavern - Interior 1 |
||
| 4 |
| 4 |
||
| 3 |
| 3 |
||
| − | | {{orb|fire}} [[Hedgehog Pie]] |
+ | | {{orb|fire}} [[Hedgehog Pie]] x3 <br> [[Security: Deathgaze Squad]] Earth, Wind, Water |
| {{link|Crystal}} x3 |
| {{link|Crystal}} x3 |
||
| + | | {{link|Crystal}} x7 |
||
|- |
|- |
||
| Northern Cavern - Interior 2 |
| Northern Cavern - Interior 2 |
||
| Line 85: | Line 92: | ||
| [[Security: Ashura Squad]] Water, Earth, Fire, Water <br> [[Security: Ixion Squad]] Water, Earth, Wind, Earth |
| [[Security: Ashura Squad]] Water, Earth, Fire, Water <br> [[Security: Ixion Squad]] Water, Earth, Wind, Earth |
||
| {{link|Bronze Opener}} x3 |
| {{link|Bronze Opener}} x3 |
||
| + | | {{link|Gold Opener}} x2 |
||
|- |
|- |
||
| Northern Cavern - Interior 3 |
| Northern Cavern - Interior 3 |
||
| Line 90: | Line 98: | ||
| 3 |
| 3 |
||
| [[Security: Mateus Squad]] Wind x3, Earth x2 <br> [[Security: Ramuh Squad]] Earth, Wind, Water, Fire, Water |
| [[Security: Mateus Squad]] Wind x3, Earth x2 <br> [[Security: Ramuh Squad]] Earth, Wind, Water, Fire, Water |
||
| + | | {{materialLink|Gigantuar Bulb|s=18px}} x1 |
||
| {{materialLink|Gigantuar Bulb|s=18px}} x1 |
| {{materialLink|Gigantuar Bulb|s=18px}} x1 |
||
|- |
|- |
||
| Line 97: | Line 106: | ||
| [[Security: Kurohabaki Squad]] Fire x2, Dark, Light <br> [[Security: Mermaid Squad]] Water x2, Fire, Dark |
| [[Security: Kurohabaki Squad]] Fire x2, Dark, Light <br> [[Security: Mermaid Squad]] Water x2, Fire, Dark |
||
| {{seed|fire}} Fire x77,777 <br> {{seed|dark}} Dark x77,777 |
| {{seed|fire}} Fire x77,777 <br> {{seed|dark}} Dark x77,777 |
||
| + | | {{seed|fire}} Fire x200,000 <br> {{seed|dark}} Dark x200,000 |
||
|- |
|- |
||
| Northern Cavern - Interior 5 |
| Northern Cavern - Interior 5 |
||
| Line 103: | Line 113: | ||
| [[Security: Manticore Squad]] Wind x2, Water, Fire <br> [[Security: Ghost Ship Squad]] Earth x2, Wind, Water |
| [[Security: Manticore Squad]] Wind x2, Water, Fire <br> [[Security: Ghost Ship Squad]] Earth x2, Wind, Water |
||
| {{seed|Water}} Water x77,777 <br> {{seed|light}} Light x77,777 |
| {{seed|Water}} Water x77,777 <br> {{seed|light}} Light x77,777 |
||
| + | | {{seed|Water}} Water x200,000 <br> {{seed|light}} Light x200,000 |
||
|- |
|- |
||
| Planet Depths - Entrance |
| Planet Depths - Entrance |
||
| Line 109: | Line 120: | ||
| [[Security: Evil Eye Squad]] Light x2, Earth, Wind <br> [[Security: Acheron Squad]] Dark x2, Light, Earth |
| [[Security: Evil Eye Squad]] Light x2, Earth, Wind <br> [[Security: Acheron Squad]] Dark x2, Light, Earth |
||
| {{seed|Wind}} Wind x77,777 <br> {{seed|Earth}} Earth x77,777 |
| {{seed|Wind}} Wind x77,777 <br> {{seed|Earth}} Earth x77,777 |
||
| + | | {{seed|Wind}} Wind x200,000 <br> {{seed|Earth}} Earth x200,000 |
||
|- |
|- |
||
| Planet Depths 1 |
| Planet Depths 1 |
||
| Line 114: | Line 126: | ||
| 3 |
| 3 |
||
| {{orb|fire}} [[Hedgehog Pie]] Large size! x4 <br> {{orb|water}} [[Proto-SOLDIER: Sapphire]] x4 |
| {{orb|fire}} [[Hedgehog Pie]] Large size! x4 <br> {{orb|water}} [[Proto-SOLDIER: Sapphire]] x4 |
||
| + | | {{link|Mog Amulet}} x1 |
||
| {{link|Mog Amulet}} x1 |
| {{link|Mog Amulet}} x1 |
||
|- |
|- |
||
| Line 120: | Line 133: | ||
| 3 |
| 3 |
||
| {{orb|fire}} [[Hedgehog Pie]] Huge size! x2 <br> {{orb|fire}} [[Proto-SOLDIER: Ruby]] x4 |
| {{orb|fire}} [[Hedgehog Pie]] Huge size! x2 <br> {{orb|fire}} [[Proto-SOLDIER: Ruby]] x4 |
||
| + | | {{link|Ability Ticket}} x20 |
||
| {{link|Ability Ticket}} x20 |
| {{link|Ability Ticket}} x20 |
||
|- |
|- |
||
| Line 126: | Line 140: | ||
| 3 |
| 3 |
||
| {{boss|Wind}} [[Guard Scorpion Mk.I]] <br> {{boss|Wind}} [[Guard Scorpion Mk.I]] x2 |
| {{boss|Wind}} [[Guard Scorpion Mk.I]] <br> {{boss|Wind}} [[Guard Scorpion Mk.I]] x2 |
||
| − | | {{link|Summon Ticket}} x1<br> |
+ | | {{link|Summon Ticket}} x1 <br> {{link|Magicite}} x500 |
| − | {{link| |
+ | | {{link|Summon Ticket}} x4 |
|- |
|- |
||
| |
| |
||
| Line 134: | Line 148: | ||
| 8 |
| 8 |
||
| 3 |
| 3 |
||
| − | | [[Guard Hound]] |
+ | | {{orb|earth}}{{orb|fire}}[[Guard Hound]] large size, {{orb|light}} [[Proto-SOLDIER: Diamond]] x4 <br> {{boss|fire}}[[Ifrit (Sicarius)]], {{boss|water}}[[Shiva (Sicarius)]] |
| + | | - |
||
| - |
| - |
||
|- |
|- |
||
| Line 140: | Line 155: | ||
| 8 |
| 8 |
||
| 3 |
| 3 |
||
| − | | {{orb|fire}}Hedgehog Pie x2, {{orb|wind}} [[Proto-SOLDIER: Emerald]] x4<br>{{ |
+ | | {{orb|fire}}Hedgehog Pie x2, {{orb|wind}} [[Proto-SOLDIER: Emerald]] x4<br>{{boss|dark}}[[Bahamut (Sicarius)]], {{boss|water}}[[Shiva (Sicarius)]] |
| + | | - |
||
| - |
| - |
||
|- |
|- |
||
| Line 146: | Line 162: | ||
| 8 |
| 8 |
||
| 3 |
| 3 |
||
| − | | {{orb|dark}} [[Proto-SOLDIER: Ultima]] x3, {{orb|dark}} [[Proto-SOLDIER: Omega]] x2<br>{{ |
+ | | {{orb|dark}} [[Proto-SOLDIER: Ultima]] x3, {{orb|dark}} [[Proto-SOLDIER: Omega]] x2<br>{{boss|fire}}[[Ifrit (Sicarius)]], {{boss|dark}}[[Bahamut (Sicarius)]] |
| + | | - |
||
| - |
| - |
||
|- |
|- |
||
| Line 152: | Line 169: | ||
| 9 |
| 9 |
||
| 3 |
| 3 |
||
| − | | {{orb|dark}} [[Proto-SOLDIER: Ultima]] x3, {{orb|dark}} [[Proto-SOLDIER: Omega]] x2<br>{{ |
+ | | {{orb|dark}} [[Proto-SOLDIER: Ultima]] x3, {{orb|dark}} [[Proto-SOLDIER: Omega]] x2 <br> {{boss|light}}{{boss|dark}}[[Guard Scorpion Mk.III]] x2 |
| + | | {{Link|Ability Ticket}} x7 |
||
| {{Link|Ability Ticket}} x7 |
| {{Link|Ability Ticket}} x7 |
||
|} |
|} |
||
| − | Starting with the ''Planet Depths'' area, Sephiroth gets a pre-emptive casting of ''Heartless Angel'', dropping you to 1 HP. Immediate heals are necessary if you hope to withstand his first onslaught, and it's pointless to heal yourself to full HP before entering the final skirmish against him. Healing boons are useful, though. |
+ | Starting with the ''Planet Depths - Entrance'' area, Sephiroth gets a pre-emptive casting of ''Heartless Angel'', dropping you to 1 HP. Immediate heals are necessary if you hope to withstand his first onslaught, and it's pointless to heal yourself to full HP before entering the final skirmish against him. Healing boons are useful, though. |
| − | Starting with ''Planet Depths 2'', the Proto-SOLDIERs get a pre-emptive hit with their elemental Ray spells, then cast ''Silence'' on you, preventing use of any Abilities for 1 round. Materia commands can still be used. In |
+ | Starting with ''Planet Depths 2'', the Proto-SOLDIERs get a pre-emptive hit with their elemental Ray spells, then cast ''Silence'' on you, preventing use of any Abilities for 1 round. Materia commands can still be used. In the Dec 2018 instance, the Proto-SOLDIERs no longer applied Silence. |
=== Ranking Rewards === |
=== Ranking Rewards === |
||
{| class="wikitable" |
{| class="wikitable" |
||
| − | ! Final Ranking !! Rewards |
+ | ! Final Ranking !! Rewards Feb 2018 !! Rewards Dec 2018 |
|- |
|- |
||
| 1 – 500 |
| 1 – 500 |
||
| Line 169: | Line 187: | ||
* [[Growing Egg (Card)|Heartful Egg ★5]] |
* [[Growing Egg (Card)|Heartful Egg ★5]] |
||
* {{Link|Crystal}} x50 |
* {{Link|Crystal}} x50 |
||
| − | * Multiplayer Skill Card: [[HP Up]] +10% |
+ | * Multiplayer Skill Card ★4: [[HP Up]] +10% |
* {{MaterialLink|Prismatic Fractal}}: Magic Up +5% |
* {{MaterialLink|Prismatic Fractal}}: Magic Up +5% |
||
| + | * {{MaterialLink|Prismatic Fractal}}: Job Change Recast |
||
| + | * {{MaterialLink|Prismatic Fractal}}: Improved Extra Skill Unlock |
||
| + | * {{MaterialLink|Prismatic Fractal}}: EXP Up +10% |
||
| + | | |
||
| + | * {{Link|Ability Ticket}} x100 |
||
| + | * [[Growing Egg (Card)|Mighty Egg ★5]] |
||
| + | * {{Link|Crystal}} x50 |
||
| + | * Multiplayer Skill Card ★4: [[HP Restored]] +10% |
||
| + | * {{MaterialLink|Prismatic Fractal}}: Magic Up +7% |
||
* {{MaterialLink|Prismatic Fractal}}: Job Change Recast |
* {{MaterialLink|Prismatic Fractal}}: Job Change Recast |
||
* {{MaterialLink|Prismatic Fractal}}: Improved Extra Skill Unlock |
* {{MaterialLink|Prismatic Fractal}}: Improved Extra Skill Unlock |
||
| Line 179: | Line 206: | ||
* {{Link|Ability Ticket}} x50 |
* {{Link|Ability Ticket}} x50 |
||
* {{Link|Crystal}} x25 |
* {{Link|Crystal}} x25 |
||
| − | * Multiplayer Skill Card: [[HP Up]] +8% |
+ | * Multiplayer Skill Card ★4: [[HP Up]] +8% |
| + | * {{MaterialLink|Prismatic Fractal}}: Job Change Recast |
||
| + | * {{MaterialLink|Prismatic Fractal}}: Improved Extra Skill Unlock |
||
| + | * {{MaterialLink|Prismatic Fractal}}: EXP Up +10% |
||
| + | | |
||
| + | * {{Link|Ability Ticket}} x50 |
||
| + | * {{Link|Crystal}} x25 |
||
| + | * Multiplayer Skill Card ★4: [[HP Restored]] +8% |
||
| + | * {{MaterialLink|Prismatic Fractal}}: Magic Up +6% |
||
* {{MaterialLink|Prismatic Fractal}}: Job Change Recast |
* {{MaterialLink|Prismatic Fractal}}: Job Change Recast |
||
* {{MaterialLink|Prismatic Fractal}}: Improved Extra Skill Unlock |
* {{MaterialLink|Prismatic Fractal}}: Improved Extra Skill Unlock |
||
| Line 188: | Line 223: | ||
* {{Link|Ability Ticket}} x25 |
* {{Link|Ability Ticket}} x25 |
||
* {{Link|Crystal}} x15 |
* {{Link|Crystal}} x15 |
||
| − | * Multiplayer Skill Card: [[HP Up]] +5% |
+ | * Multiplayer Skill Card ★4: [[HP Up]] +5% |
| + | * {{MaterialLink|Prismatic Fractal}}: Improved Extra Skill Unlock |
||
| + | * {{MaterialLink|Prismatic Fractal}}: EXP Up +10% |
||
| + | | |
||
| + | * {{Link|Ability Ticket}} x25 |
||
| + | * {{Link|Crystal}} x15 |
||
| + | * Multiplayer Skill Card ★4: [[HP Restored]] +5% |
||
| + | * {{MaterialLink|Prismatic Fractal}}: Magic Up +5% |
||
* {{MaterialLink|Prismatic Fractal}}: Improved Extra Skill Unlock |
* {{MaterialLink|Prismatic Fractal}}: Improved Extra Skill Unlock |
||
* {{MaterialLink|Prismatic Fractal}}: EXP Up +10% |
* {{MaterialLink|Prismatic Fractal}}: EXP Up +10% |
||
|- |
|- |
||
| 3001 – 10,000 |
| 3001 – 10,000 |
||
| + | | |
||
| + | * {{Link|Ability Ticket}} x15 |
||
| + | * {{Link|Crystal}} x10 |
||
| + | * {{MaterialLink|Prismatic Fractal}}: EXP Up +10% |
||
| |
| |
||
* {{Link|Ability Ticket}} x15 |
* {{Link|Ability Ticket}} x15 |
||
| Line 199: | Line 245: | ||
|- |
|- |
||
| 10,001+ |
| 10,001+ |
||
| + | | |
||
| + | * {{Link|Ability Ticket}} x10 |
||
| + | * {{Link|Crystal}} x5 |
||
| |
| |
||
* {{Link|Ability Ticket}} x10 |
* {{Link|Ability Ticket}} x10 |
||
| Line 204: | Line 253: | ||
|- |
|- |
||
| Participation bonus |
| Participation bonus |
||
| + | | |
||
| + | * {{Link|Crystal}} x10 |
||
| |
| |
||
* {{Link|Crystal}} x10 |
* {{Link|Crystal}} x10 |
||
| Line 253: | Line 304: | ||
== Reference == |
== Reference == |
||
| − | [http://information.mobiusfinalfantasy.com/ne/2018/02/21/9609889e7f595dcc3dc9fcad427fe6ce2e011fd4.html |
+ | * [http://information.mobiusfinalfantasy.com/ne/2018/02/21/9609889e7f595dcc3dc9fcad427fe6ce2e011fd4.html Feb 2018 News Page Announcement] |
| + | * [http://information.mobiusfinalfantasy.com/ne/2018/12/24/70c3073630e24f6255b8e029f0a13040d5f45745.html Dec 2018 News Page Announcement] |
||
| − | |||
| + | * [https://www.youtube.com/watch?v=FIv1X96fjcQ The drama cutscenes], compiled by BuffMeister on YouTube |
||
[[Category:Battle Tower Events]] |
[[Category:Battle Tower Events]] |
||
Latest revision as of 14:54, 5 July 2019
| “ | FINAL FANTASY VII meets MOBIUS FF
Despair echoes from the planetary depths. Wield the power of materia and challenge the hero from the skies. |
„ |
| ~ In-game description |
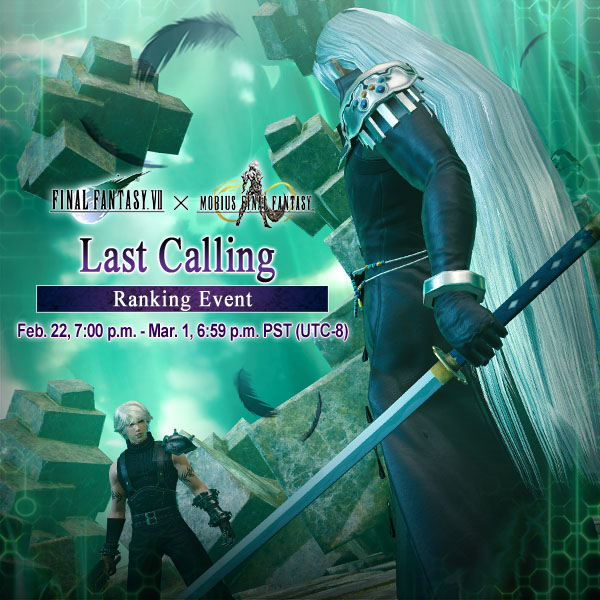
Last Calling is a Ranked "battle tower" event offered as part of the Final Fantasy VII Collaboration Events. It features solo battles against Sephiroth.
Event Details
- First instance: February 22 – March 1, 2018
- Second instance: December 17 – 31, 2018
- Event type: progressive Tower Battle
How to Participate

- Select "FFVII: Last Calling" from the Act 1 world map -- off of the red "Specials" hub.
- This event is only accessible after a player clears the Runic Temple in Chapter 1
Story
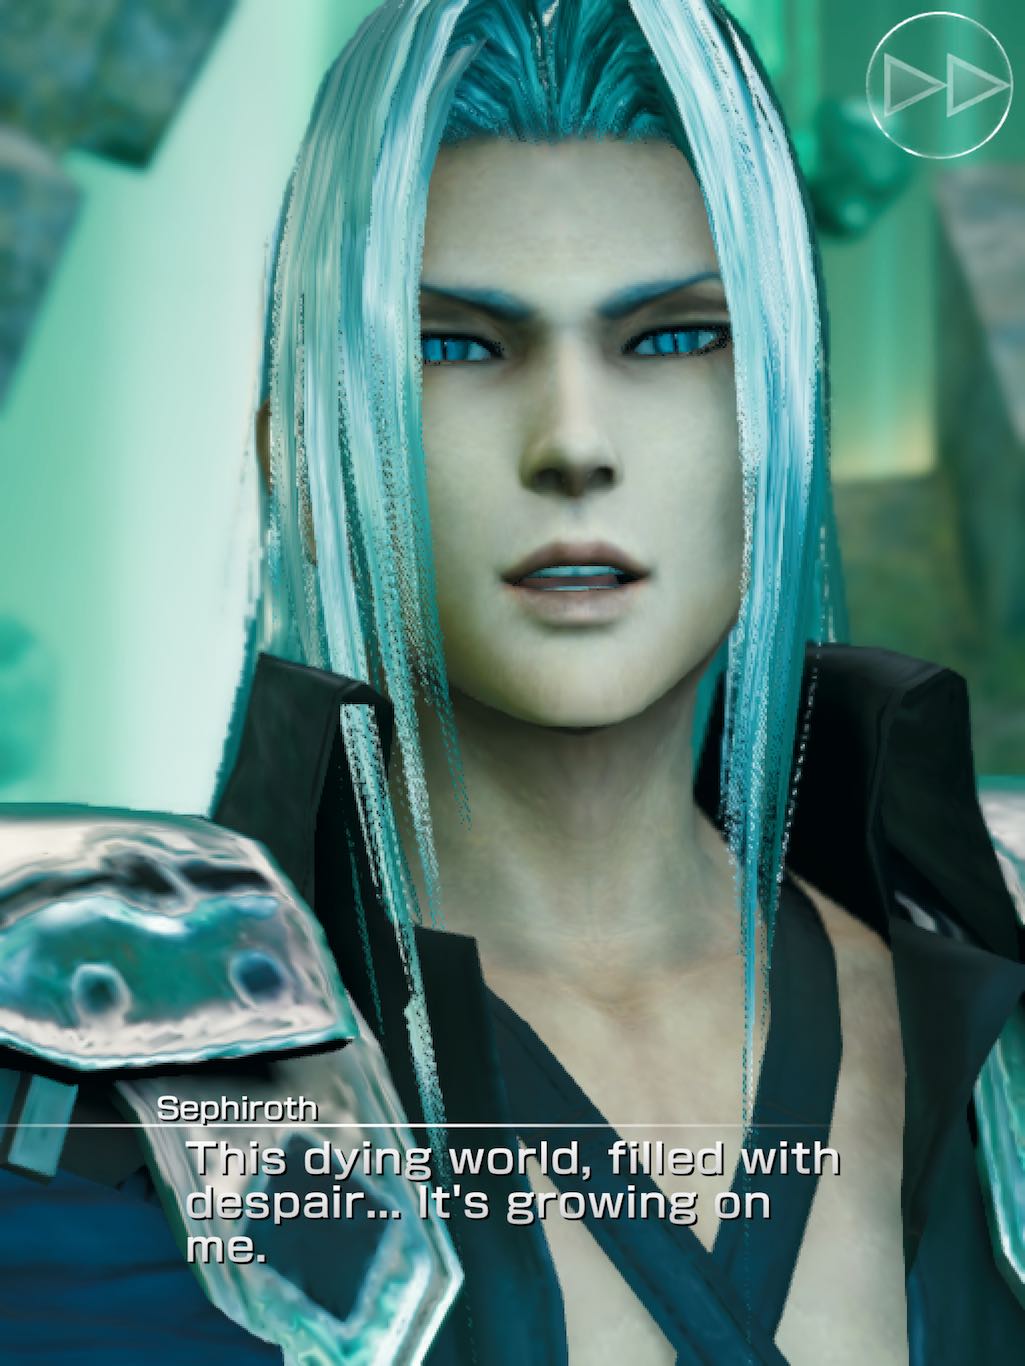
After the events of Fatal Calling, Wol shows up back at the Northern Cavern to find Sephiroth waiting for him. Despite Echo's panic, Wol leaps straight into the fray... and Sephiroth disperses in a cloud of black feathers at the first strike. So... not the real Sephiroth, but an echo of the real one's presence; possibly a result of Palamecia's uniquely adversarial nature. This will need to be cleaned out.
After eliminating a few, er, echoes, Echo asks how it feels to take on THE Sephiroth. Wol isn’t particularly satisfied, since these are weak copies. Why bother if they aren’t strong enough to win? But at least he still gets to complain, says Echo.
Echo gets a brilliant idea: a picture of Wol fighting Sephiroth! Well, fake Seph, but who'd know the difference? Or maybe a picture with Seph and Echo... or maybe a selfie that Seph can share with his fans!? Wol has no idea what she’s talking about.
And how does he wield such a long sword? Never mind using it, how does he draw it? Let's just say it takes a great swordsman... and Wol includes himself amongst that number.
But at the end of the path, Sephiroth offers a strong verbal challenge... and Wol stops. Our hero recognizes that he's still far outclassed by the champion of despair. If this is still a copy, Wol shudders to think of what kind of power the real one can muster. This Sephiroth comments that Palamecia is growing on him. He'll stick around a while.... and vanishes in a puff of darkness. Ultimate showdowns will have to wait for another time.
Event Map
| “ | Despair echoes from the planetary depths. Wield the power of materia and challenge the hero from the skies. | „ |
| ~ World Map description |
The original Feb 2018 event allowed use of Materia commands, giving an extra set of up to 6 actions that could be used in this conflict. Depending on how much materia the player has gathered in Fatal Calling, these can be major spells.... and these were essential for victory once the player reached the final areas of the map. Subsequent appearances dropped the Materia use (and re-balanced difficulties), allowing anyone to participate.
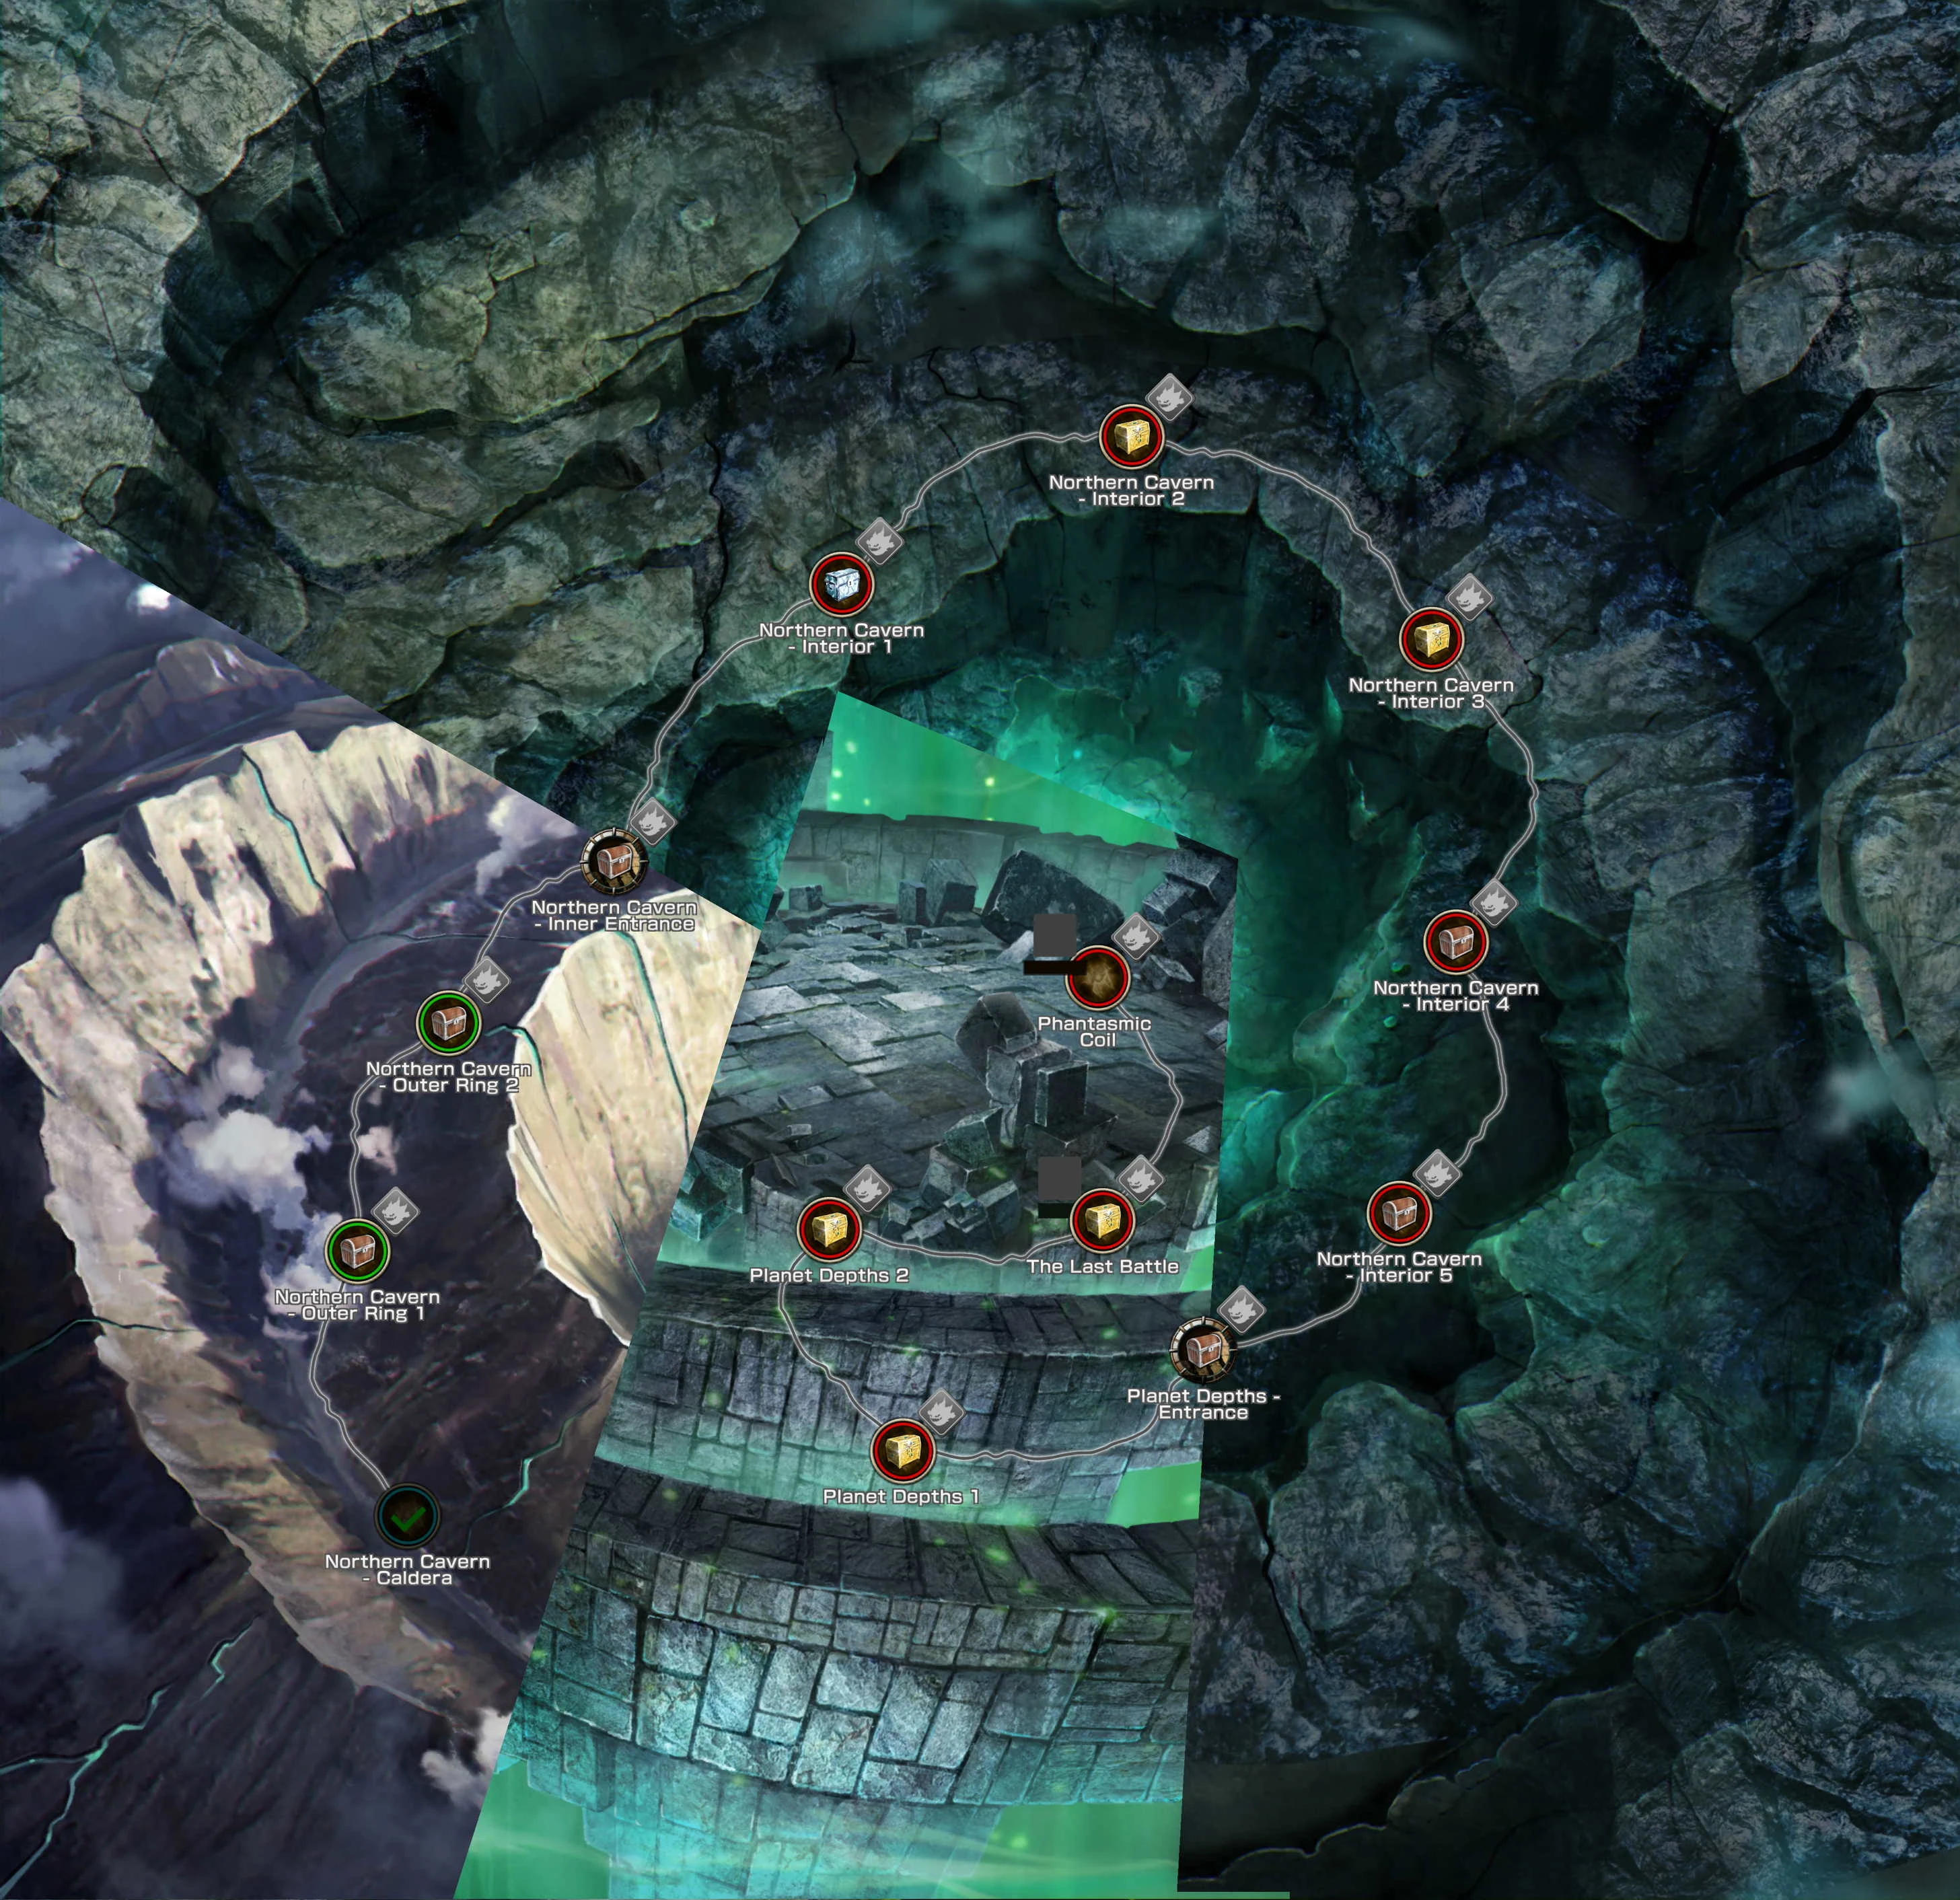
The progression is a linear one on this event, going from the outer surface down and in to the central space amongst the Planet Depths. Along the way, the player will change maps twice, but the progression maintains a single path. Enemies along the way comprise a comprehensive medley of the enemies from Fatal Calling, as well as both the current and original enemies from Eclipse Contact. Each area finishes with a solo fight against ![]() Sephiroth Copy. As in other ranked events, Sephiroth starts out very easy to beat, but gets progressively harder with each victory.
Sephiroth Copy. As in other ranked events, Sephiroth starts out very easy to beat, but gets progressively harder with each victory.
Clearing an area also drops a Sephiroth Copy (Card), useful to upgrade the Sephiroth: DISSIDIA FF (Card) handed over as a gift at the beginning of the FFVII Campaign. The player can teleport back to previously completed areas at any time. Since only the areas on the current map are visible, the player must again defeat the transitional areas to switch to the previous maps. Repeating previously cleared areas will earn more cards, but does not increase the player's kill count or ranking.
After completing The Last Battle , the player enters the Phantasmic Coil areas. This is a set of 4 areas that repeat in an infinite loop, also with an increasing difficulty with each area finished. Players here do not get a fifth "rental" card, and cannot use ![]() Phoenix Down to revive if defeated. Each cycle through the 4 Phantasmic Coil areas will get a reward of
Phoenix Down to revive if defeated. Each cycle through the 4 Phantasmic Coil areas will get a reward of ![]() Ability Ticket x7.
Ability Ticket x7.
There are 17 total areas and 13 treasure chests. Since the last treasure chest (in the Phantasmic Coil) automatically regenerates, the last chest can technically never be completed.
Areas
| Area | Stamina | Battles | Enemies (except Sephiroth) | Treasure 1 | Treasure 2 |
|---|---|---|---|---|---|
| Northern Cavern - Caldera | - | - | - | (starting point) | |
| Northern Cavern - Outer Ring 1 | 3 | 2 | Security: Medical Team Fire x2 | ||
| Northern Cavern - Outer Ring 2 | 3 | 3 | Guard Hound Wind, Earth, Light Security: Nekomata Squad Water x2 |
||
| Northern Cavern - Inner Entrance | 3 | 3 | Security: Titan Squad Fire, Wind, Earth |
||
| Northern Cavern - Interior 1 | 4 | 3 | Security: Deathgaze Squad Earth, Wind, Water |
||
| Northern Cavern - Interior 2 | 4 | 3 | Security: Ashura Squad Water, Earth, Fire, Water Security: Ixion Squad Water, Earth, Wind, Earth |
||
| Northern Cavern - Interior 3 | 4 | 3 | Security: Mateus Squad Wind x3, Earth x2 Security: Ramuh Squad Earth, Wind, Water, Fire, Water |
||
| Northern Cavern - Interior 4 | 5 | 3 | Security: Kurohabaki Squad Fire x2, Dark, Light Security: Mermaid Squad Water x2, Fire, Dark |
||
| Northern Cavern - Interior 5 | 5 | 3 | Security: Manticore Squad Wind x2, Water, Fire Security: Ghost Ship Squad Earth x2, Wind, Water |
||
| Planet Depths - Entrance | 5 | 3 | Security: Evil Eye Squad Light x2, Earth, Wind Security: Acheron Squad Dark x2, Light, Earth |
||
| Planet Depths 1 | 6 | 3 | |||
| Planet Depths 2 | 6 | 3 | |||
| The Last Battle | 6 | 3 | |||
| Phantasmic Coil 1 | 8 | 3 | - | - | |
| Phantasmic Coil 2 | 8 | 3 | - | - | |
| Phantasmic Coil 3 | 8 | 3 | - | - | |
| Phantasmic Coil 4 | 9 | 3 |
Starting with the Planet Depths - Entrance area, Sephiroth gets a pre-emptive casting of Heartless Angel, dropping you to 1 HP. Immediate heals are necessary if you hope to withstand his first onslaught, and it's pointless to heal yourself to full HP before entering the final skirmish against him. Healing boons are useful, though.
Starting with Planet Depths 2, the Proto-SOLDIERs get a pre-emptive hit with their elemental Ray spells, then cast Silence on you, preventing use of any Abilities for 1 round. Materia commands can still be used. In the Dec 2018 instance, the Proto-SOLDIERs no longer applied Silence.
Ranking Rewards
| Final Ranking | Rewards Feb 2018 | Rewards Dec 2018 |
|---|---|---|
| 1 – 500 |
|
|
| 501 – 1000 |
|
|
| 1001 – 3000 |
|
|
| 3001 – 10,000 |
|
|
| 10,001+ |
|
|
| Participation bonus |
|
|
Fiends
| Original Eclipse Contact enemies | New Eclipse Contact and Fatal Calling enemies |
Fatal Calling specific enemies |
|---|---|---|
Item Shop Sale
During the event, an extra sale was active:
- Custom skills can be unlocked on jobs at a 20% seed discount.
- Card Fusion has a 20% extra success rate, similar to Mobius Days.
- Items in the Item Shop purchasable with
 Magicite are available at a 20% discount.
 - The Item Shop has two special bundles:
- Elixir x60 for Magicite x4000
- Phoenix Down x60 for Magicite x4000
Reference
- Feb 2018 News Page Announcement
- Dec 2018 News Page Announcement
- The drama cutscenes, compiled by BuffMeister on YouTube