| “ | Welcome to Yggdrasil, where abilities flower to their full potential. Enemies here will drop different ability scrolls by area. Fuse an ability scroll to level that ability. Teleport to the area of the card you want to enhanced and go to battle! | „ |
| ~ Region Tip |
Yggdrasil: Zone 1 is one of the special Yggdrasil regions, used for leveling abilities and unlocking extra skills.
Ability Zone[]
The area is populated with areas that each focus on a specific Ability Card. Finishing one of these areas will always reward 5x Scrolls for the selected Ability Card.
Many of the Scroll cards previously offered for a limited time in the Item Exchange during 2017 now have permanent homes here.
Extra Skill Zone[]
With the Dec 2018 update, the Extra Skill section in the center has been removed, and can now be found in the Yggdrasil: Materials Zone region.
Region Info[]
| “ | A holy place, wellspring of power for the Blanks under the watchful boughs of Yggdrasil. | „ |
| ~ World Map description |
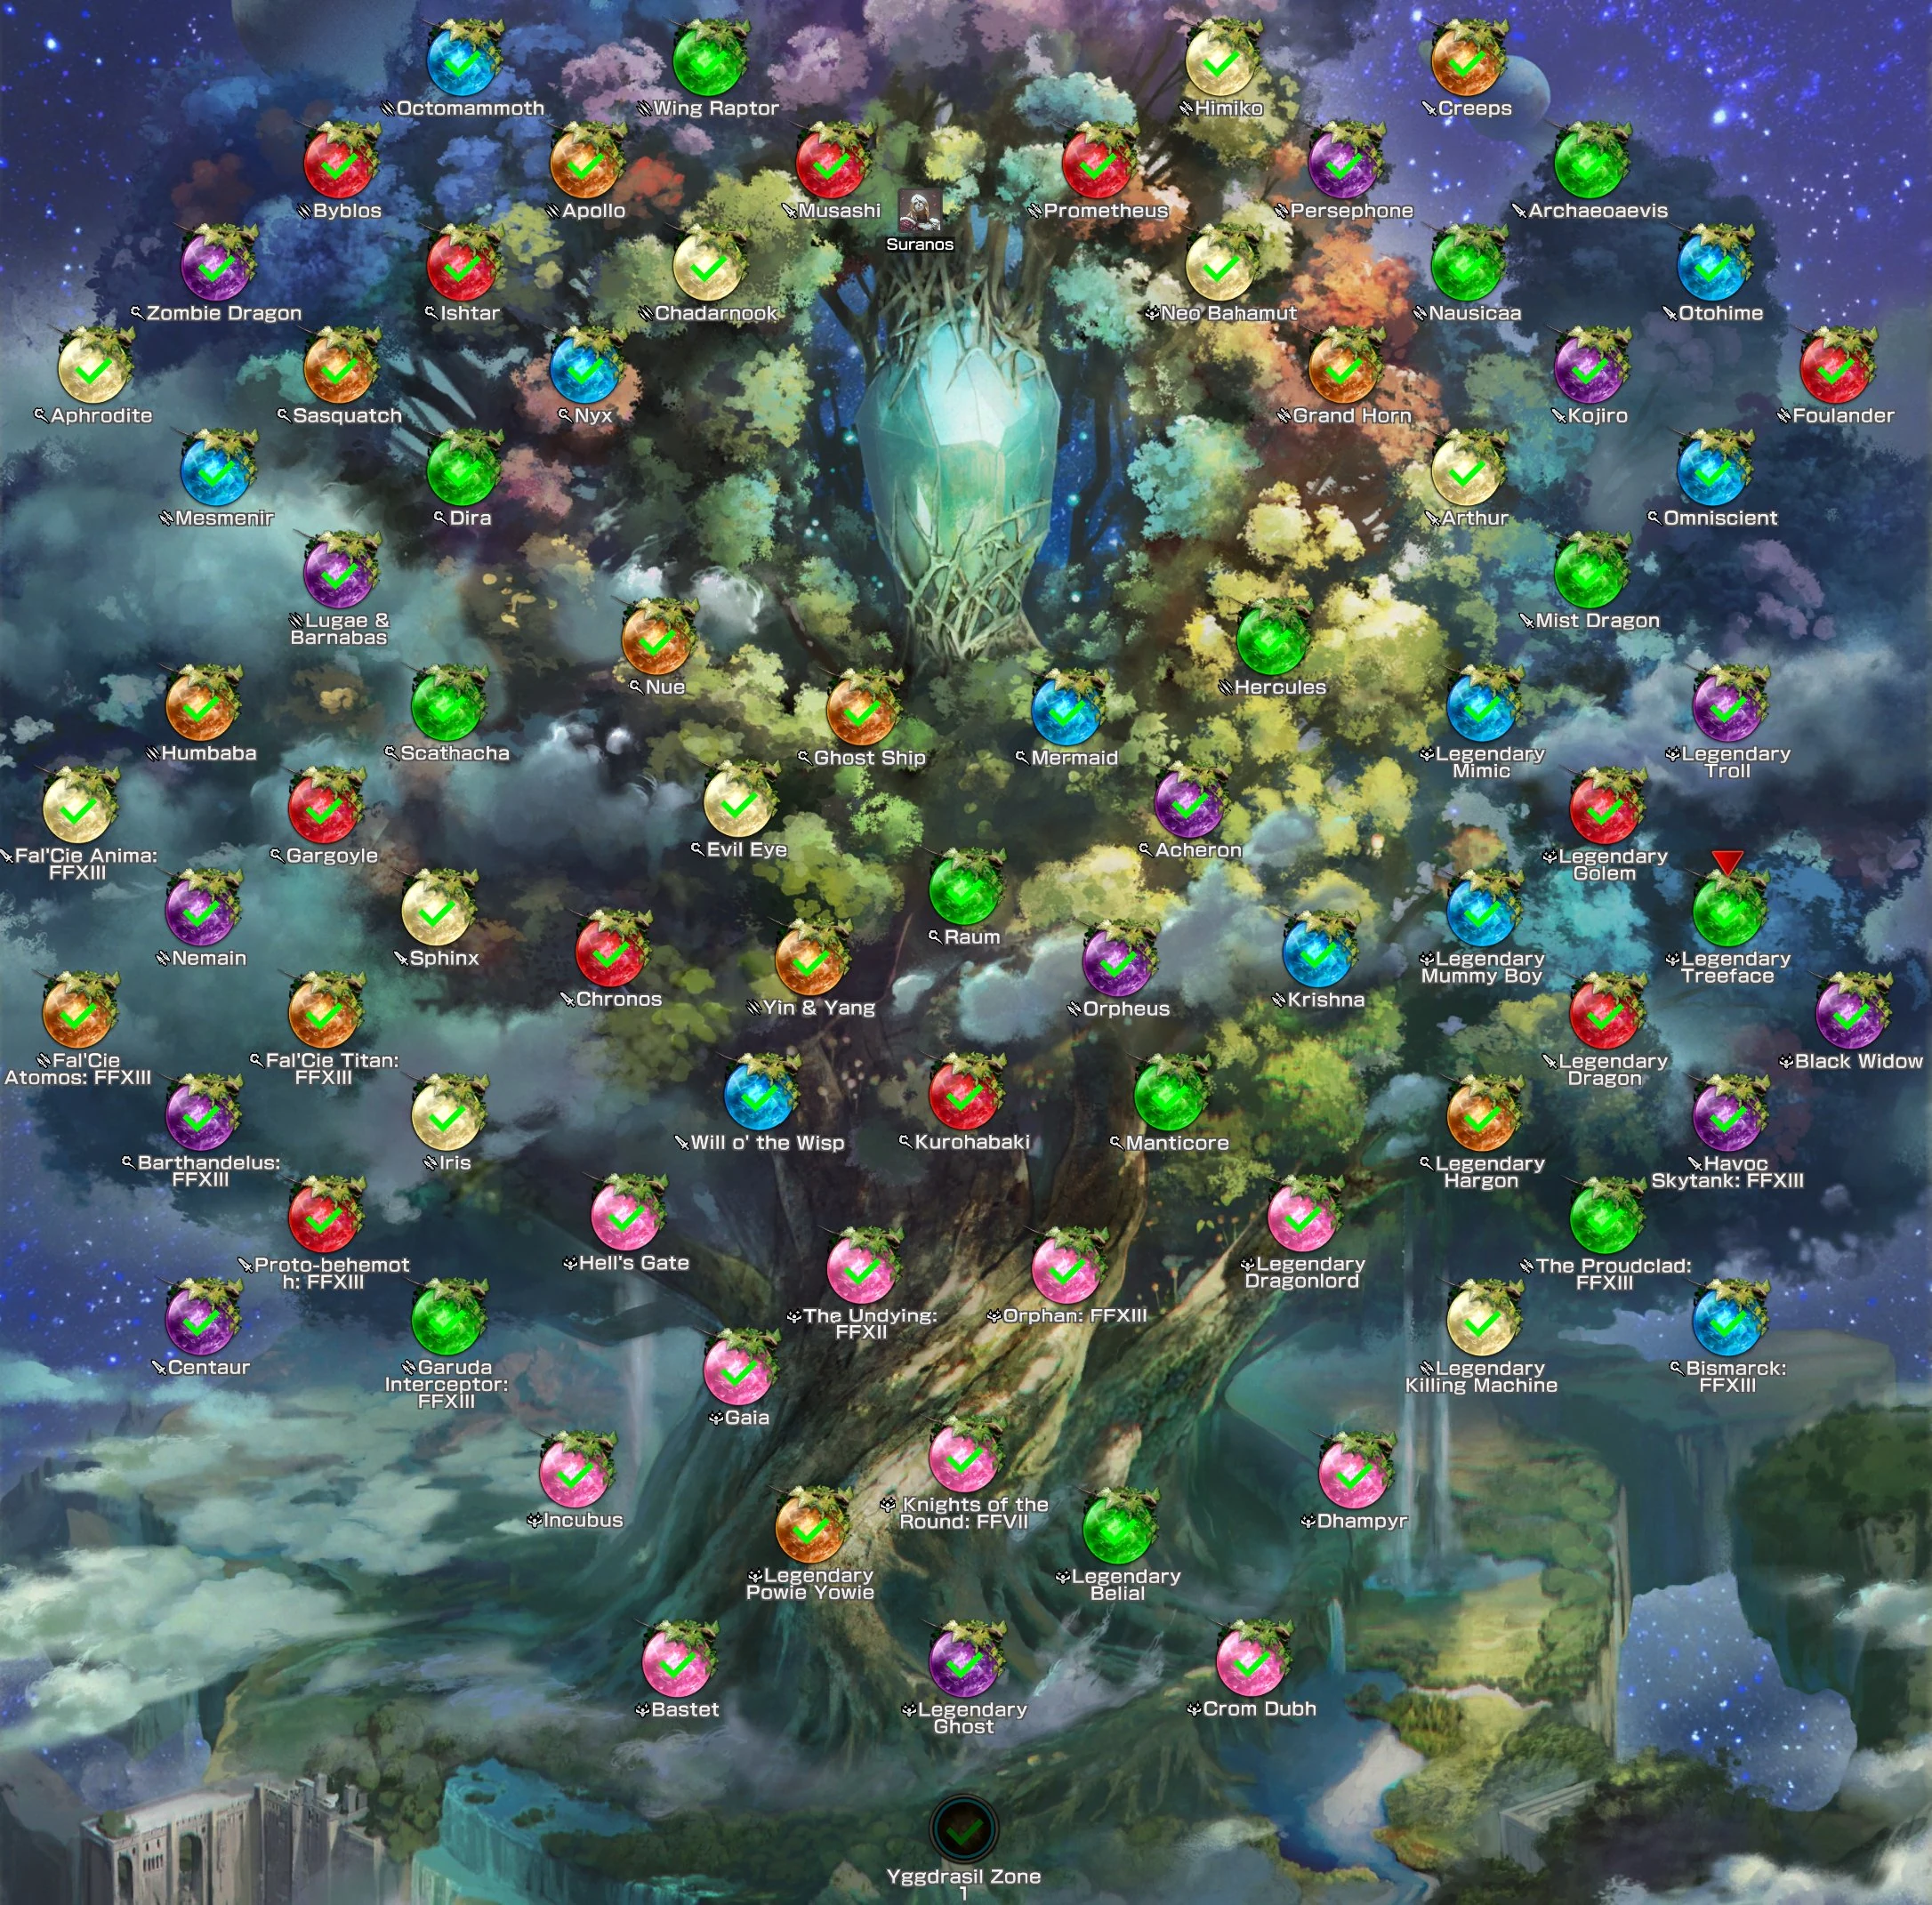
Each area is shown with the color of the Abillity's element, and the title starts with the relevant Job Class. Enemies for each area are the same element as the listed one, so you're encouraged to show up with something in the opposite element. However, since the enemies tend to be Dust fiends, Elementals, and PuPus, you should be able to use basic attacks to kill anything you encounter.
The most notorious enemies here are in the ![]() Life areas, which feature Gold Bombs. These immediately explode when they show up, taking half your remaining health with each one, but these alone cannot kill you.
Life areas, which feature Gold Bombs. These immediately explode when they show up, taking half your remaining health with each one, but these alone cannot kill you.
There are 81 zones total, and no treasure chests. All areas can be teleported to, with the exception of the opening "Yggdrasil Zone 1" area.
Seed (Area) List[]
| Obtainable Seeds | Skill Name | Type | Element | Usage | Position |
|---|---|---|---|---|---|
| Knights of the Round: FFVII | Ultimate Boon | Support Abilities | Lower Center | ||
| The Undying: FFXII | Enrage | Support Abilities | Lower Center | ||
| Orphan: FFXIII | Dies Irae | Support Abilities | Lower Center | ||
| Hell's Gate | Mighty Guard | Support Abilities | Lower Center | ||
| Crom Dubh | Warrior's Trance | Support Abilities | Lower Center | ||
| Dhampyr | Mage's Trance | Support Abilities | Lower Center | ||
| Incubus | Monk's Trance | Support Abilities | Lower Center | ||
| Bastet | Ranger's Trance | Support Abilities | Lower Center | ||
| Legendary Powie Yowie | Slowga | Ailment Attacks | Lower Center | ||
| Legendary Ghost | Dispelga | Ailment Attacks | Lower Center | ||
| Legendary Belial | Stunga | Ailment Attacks | Lower Center | ||
| Centaur | Cold Blood | Damage Focus Attacks | Left | ||
| Iris | Searing Ray | Damage Focus Attacks | Left | ||
| Nemain | Dark Vengeance | Damage Focus Attacks | Left | ||
| Proto-behemoth: FFXIII | Inferno Blade | Damage Focus Attacks | Left | ||
| Garuda Interceptor: FFXIII | Hellstorm Bolt | Damage Focus Attacks | Left | ||
| Barthandelus: FFXIII | Destrudo | Damage Focus Attacks | Left | ||
| Fal'Cie Anima: FFXIII | Forbidden Laser | Damage Focus Attacks | Left | ||
| Fal'Cie Atomos: FFXIII | Rolling Stone | Damage Focus Attacks | Left | ||
| Fal'Cie Titan: FFXIII | Fal'Cie's Wrath | Damage Focus Attacks | Left | ||
| Humbaba | Earthen Backhand | Damage Focus Attacks | Left | ||
| Gargoyle | Immolate | Damage Focus Attacks | Left | ||
| Sphinx | Avenging Light | Damage Focus Attacks | Left | ||
| Scathacha | Blowback | Damage Focus Attacks | Left | ||
| Legendary Dragon | Overcook | Ailment Attacks | Right | ||
| Legendary Dragonlord | High Tension | Support Abilities | Right | ||
| Legendary Hargon | Hideous Stone | Ailment Attacks | Right | ||
| Legendary Mummy Boy | Cursega | Ailment Attacks | Right | ||
| Legendary Golem | Unguardga | Ailment Attacks | Right | ||
| Legendary Mimic | Debravega | Ailment Attacks | Right | ||
| Legendary Troll | Bioga | Ailment Attacks | Right | ||
| Legendary Killing Machine | Tyranny of Light | Ailment Attacks | Right | ||
| Legendary Treeface | Weakenga | Ailment Attacks | Right | ||
| Black Widow | Sleep | Ailment Attacks | Right | ||
| Havoc Skytank: FFXIII | Overshade | Ailment Attacks | Right | ||
| The Proudclad: FFXIII | Tyranny of Wind | Ailment Attacks | Right | ||
| Bismarck: FFXIII | Hideous Blizzard | Ailment Attacks | Right | ||
| Nue | Great Attractor | Ailment Attacks | Center | ||
| Ghost Ship | Amber Selene | Ailment Attacks | Center | ||
| Mermaid | Blue Diana | Ailment Attacks | Center | ||
| Evil Eye | Bright Diana | Ailment Attacks | Center | ||
| Acheron | Violet Selene | Ailment Attacks | Center | ||
| Hercules | Piledriver | Ailment Attacks | Center | ||
| Chronos | Leadthrower | Ailment Attacks | Center | ||
| Yin & Yang | Sudden Attack | Damage Focus Attacks | Center | ||
| Will o' the Wisp | Ignis Fatuus | Damage Focus Attacks | Center | ||
| Raum | Sonic Boom | Damage Focus Attacks | Center | ||
| Kurohabaki | Scarlet Diana | Ailment Attacks | Center | ||
| Orpheus | Dark Requiem | Damage Focus Attacks | Center | ||
| Manticore | Turquoise Selene | Ailment Attackse | Center | ||
| Krishna | Clash of Arms | Ailment Attacks | Center | ||
| Gaia | Heartshift | Support Abilities | Center | ||
| Aphrodite | Bright Varuna | Ailment Attacks | Top Left | ||
| Zombie Dragon | Violet Varuna | Ailment Attacks | Top Left | ||
| Byblos | Fist of Crushing Flame | Ailment Attacks | Top Left | ||
| Octomammoth | Fist of Crushing Ice | Ailment Attacks | Top Left | ||
| Mesmenir | Icy Blast | Ailment Attacks | Top Left | ||
| Sasquatch | Amber Varuna | Ailment Attacks | Top Left | ||
| Ishtar | Scarlet Varuna | Ailment Attacks | Top Left | ||
| Apollo | Fist of Crushing Earth | Ailment Attacks | Top Left | ||
| Wing Raptor | Fist of Crushing Wind | Ailment Attacks | Top Left | ||
| Lugae & Barnabas | Fist of Crushing Darkness | Ailment Attacks | Top Left | ||
| Dira | Turquoise Varuna | Ailment Attacks | Top Left | ||
| Nyx | Blue Varuna | Ailment Attacks | Top Left | ||
| Chadarnook | Fist of Crushing Light | Ailment Attacks | Top Left | ||
| Musashi | Flamesoul | Ailment Attacks | Top Left | ||
| Creeps | Earthsoul | Ailment Attacks | Top Right | ||
| Archaeoaevis | Windsoul | Ailment Attacks | Top Right | ||
| Otohime | Icesoul | Ailment Attacks | Top Right | ||
| Foulander | Fiery Blast | Ailment Attacks | Top Right | ||
| Himiko | Brilliant Blast | Ailment Attacks | Top Right | ||
| Persephone | Darkening Blast | Ailment Attacks | Top Right | ||
| Nausicaa | Windy Blast | Ailment Attacks | Top Right | ||
| Kojiro | Darksoul | Ailment Attacks | Top Right | ||
| Omniscient | Forbidden Blizzard | Damage Focus Attacks | Top Right | ||
| Prometheus | Prominence | Damage Focus Attacks | Top Right | ||
| Neo Bahamut | Burst Gale | Ailment Attacks | Top Right | ||
| Grand Horn | Earthen Blast | Ailment Attacks | Top Right | ||
| Arthur | Lightsoul | Ailment Attacks | Top Right | ||
| Mist Dragon | Dragon Claw | Damage Focus Attacks | Top Right |